How to Easily Integrate Shopify with GA4

Are you looking to harness the power of Google Analytics 4 for your Shopify store? The Shopify GA4 integration has become essential for eCommerce businesses to gain deeper insights into customer behavior and make data-driven decisions. With Google’s shift towards GA4, it’s crucial to understand how this new analytics platform can revolutionize your approach to tracking and analyzing your online store’s performance.

This guide will walk you through integrating GA4 with your Shopify store. You’ll learn how to set up a GA4 property, use Google Tag Assistant to verify your implementation, and leverage Google Tag Manager for advanced tracking. We’ll also cover customizing your GA4 setup to capture Shopify-specific data and show you how to analyze this information effectively. 

By the end, you will be able to maximize Google Analytics 4 for your Shopify business.

Understanding GA4 for Shopify

Google Analytics 4 (GA4) represents a significant shift from Universal Analytics (UA), offering new features and capabilities that can revolutionize how you track and analyze your Shopify store’s performance. 

One key difference is GA4’s event-based data model, which captures all interactions as events, providing a more comprehensive view of user behavior across multiple platforms and devices.

GA4 introduces enhanced measurement capabilities, allowing for more accurate tracking of eCommerce activities. Unlike UA, where eCommerce tracking was optional, GA4 includes eCommerce reporting by default in the “Monetization” section. You can start analyzing your Shopify store’s performance immediately without additional setup.

GA4’s benefits for e-commerce include improved cross-device tracking, which enables you to follow a user’s journey across different devices, providing valuable insights into the customer lifecycle. GA4 also offers predictive analytics, leveraging machine learning to forecast customer lifetime value and churn rates, helping you make data-driven decisions to optimize your marketing strategies.

Important metrics to track in GA4 for your Shopify store include eCommerce revenue, average order value (AOV), and shopping cart abandonment rate. These metrics provide crucial insights into your store’s overall health and areas for improvement. GA4 also allows for custom dimensions and metrics, enabling you to track specific data points important to your business.

By integrating GA4 with your Shopify store, you can harness the power of advanced analytics to drive growth and success in your eCommerce business.

How to Integrate GA4 with Shopify

Connecting Shopify and Google Analytics has become more streamlined over time thanks to the process being mostly automated. All you need to do is follow a few simple steps, and the rest should take care of itself.

Step 1: Create a Google Account and Google Analytics Account

Before you can integrate anything, you’re going to need a Google account and a Google Analytics account; if you’ve already done this, you can move on to the next step.

If you already use other Google products like Gmail or Google Ads, you can use the same account for Google Analytics. If not, creating a Google account is relatively simple. Just follow this link and follow the instructions, and your Google account will be up and running before you know it.

After this, you can create a Google Analytics account. The process is also fairly straightforward, and you can do it here. If you need a little guidance, Google offers a helpful tutorial that will get you started quickly.

Step 2: Create a Google Analytics 4 Property

A GA4 property is a collection of digital assets owned by an organization. They can include websites, apps, eCommerce stores and more. If you are not the owner or admin of the GA4 account in question, you will need to have an ‘editor’ role on the account to create a property.

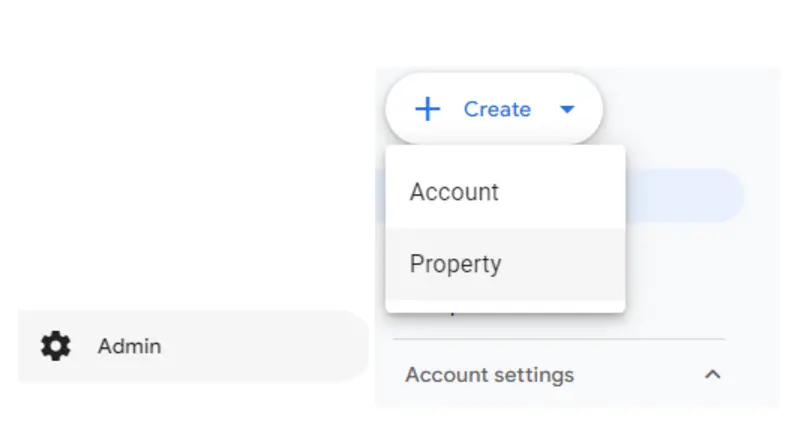
Select the ‘Admin’ icon, which is the cog at the bottom of the menu on the left side of the Google Analytics window. Then select ‘Create’ and ‘Property’.

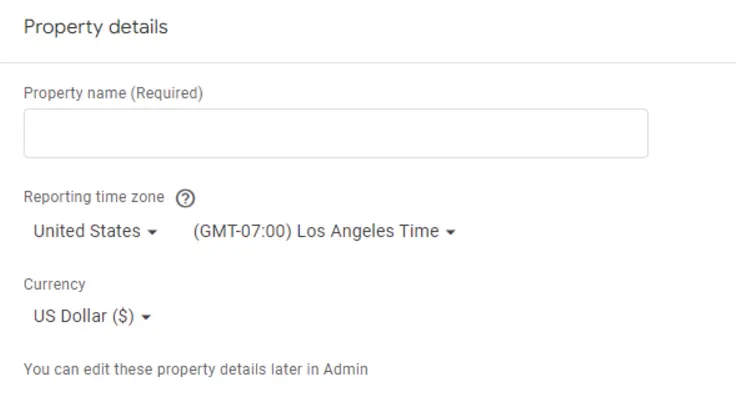
Give your property a name, and select a time zone and currency for reporting. Remember that making changes to the time zone and currency will impact how Analytics reports on performance, so try not to change it at a later time unless you have to.

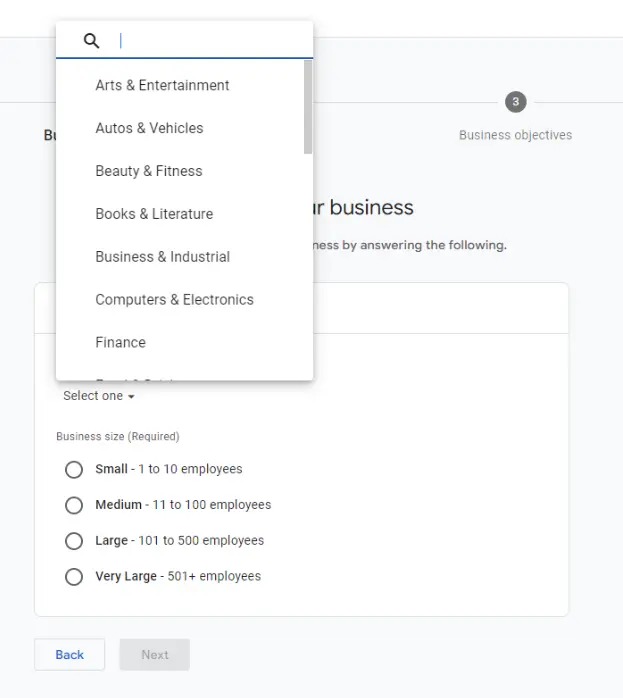
Click ‘Next’ to choose your industry category and business size, and click ‘next’ again to decide how you’re going to use Google Analytics.

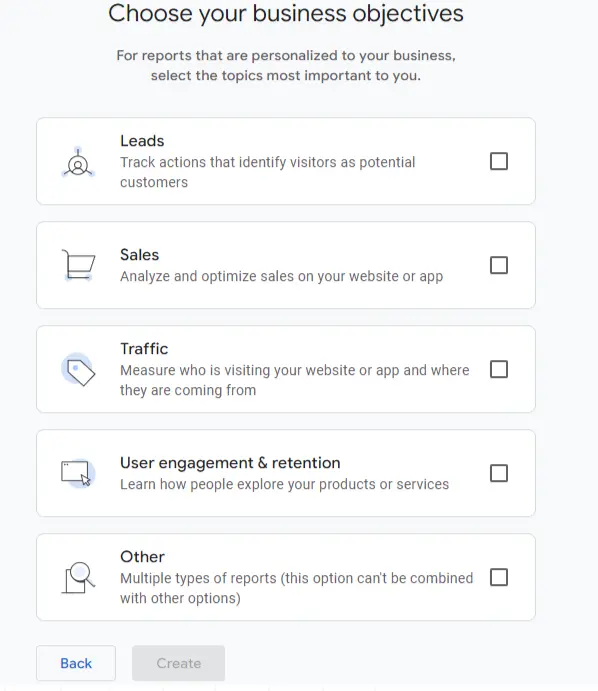
Next, select your business objectives for the property, whether those be leads, sales, traffic, or any of the other options given to you.

Once done, click ‘create’, accept the terms of service and the Data Processing Amendment, and continue to add a data stream to start collecting information.

Step 3: Create a Data Stream in Google Analytics.

You need to create a data stream for your property to gather data. 

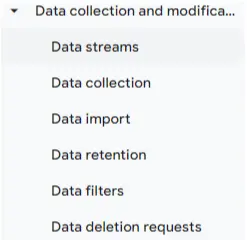
In the ‘Admin’ window, look for ‘Data collection and modification’, and click Data Streams.

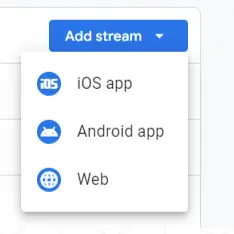
Then select ‘Add stream’. From there you can select a data stream for iOS, Android, or Web. Since you will be setting this up for your Shopify platform, select ‘web’.

Enter the URL (web address) of your online store, and enter in a stream name for your data stream. Enable ‘enhanced measurements’ to automatically collect information about events on your site (you can disable these later if you don’t want them), and to finalize, click ‘Create & Continue’.

Step 4: Implement Google Analytics 4 Tags

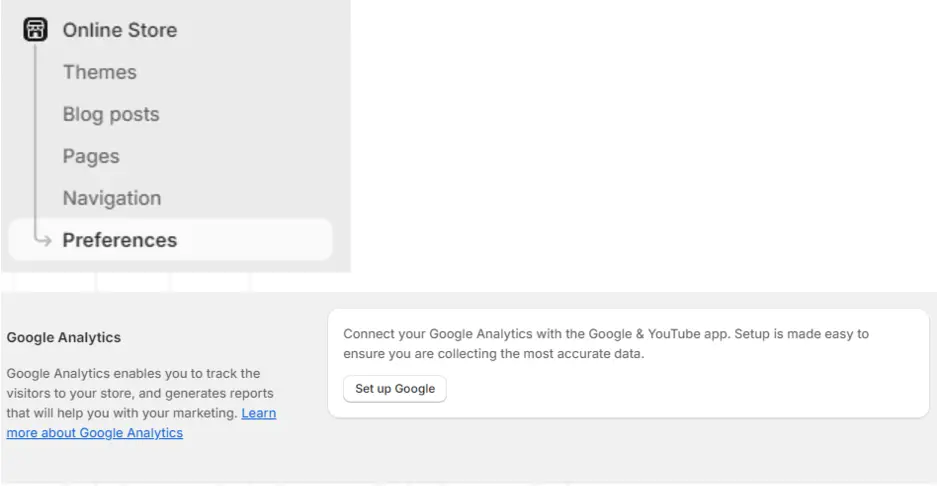
Log into your Shopify admin and navigate to ‘Online Store’ then ‘Preferences’.

Look for ‘Google Analytics’, and click on ‘Set up Google’.

You will be taken to the ‘Install App’ screen which gives you a rundown of the types of data that Google will have access to. Click the ‘Install’ button to continue.

Click on ‘Connect’ in the ‘Connect your Google Account’ section. A window will open to allow you to to sign into your Google Account to connect it with Shopify

Then navigate to the ‘Connect a Google Analytics Property’ section to select the tag you want for the GA4 property you had set up in step 2, so that you can connect it to your Shopify store.

To finish up, click ‘Connect’.

This should allow GA4 tags to automatically track eCommerce events. 

The types of events that can be tracked like this include the following:

‘Page_view’: when a customer visits a page on your store.

‘Search’: when a customer searches for a product on your store.

‘View_item’: when a customer views a product on your store

‘Add_to_cart’: when a customer adds a product to their cart

‘Begin_checkout’: when a customer starts the checkout process

‘Add_payment_info’: when a customer loads their payment information

‘Purchase’: when a customer completes their checkout process.

Analyzing Shopify Data in GA4

Using e-commerce reports

GA4’s ECommerce reports provide valuable insights into your Shopify store’s performance. The Ecommerce purchases report under Monetization offers a comprehensive view of your store’s transactions. This report details products purchased, quantities sold, and revenue generated. To gain deeper insights, add a secondary dimension like “Session source / medium” to break down purchases by traffic source.

Creating custom explorations

Custom explorations in GA4 allow you to dig deeper into your Shopify data. To create a custom report, go to the Explore tab and select “Free form” to start with a blank canvas. You can add dimensions like “Source” to analyze traffic sources, as well as metrics like revenue or conversions. Use filters to focus on specific data points, such as social media traffic. You can also create custom segments to analyze different user groups, such as purchasers or cart abandoners.

Leveraging predictive metrics

GA4’s predictive metrics use machine learning to forecast future customer behavior. These metrics include purchase probability and predicted revenue. Purchase probability estimates the likelihood of a user purchasing within the next seven days, while predicted revenue forecasts expected revenue from all purchase conversions in the next 28 days. 

To improve the accuracy of these predictions, ensure you’re collecting relevant events like purchases and in-app purchases. These insights can help you optimize your marketing strategies and improve your Shopify store’s performance.

Work With Us

If you need assistance with analytics integrations, we can help. Whether you are an enterprise-level eCommerce titan or a boutique start-up, Fahrenheit Marketing works with eCommerce companies to streamline and optimize their processes. From content strategy to web development to user experience design, we employ the brightest digital specialists in the game. Reach out to our team, and let’s chat. We would love to help you identify, progress, and achieve your business goals.

FAQs

Why might GA4 not function properly on Shopify?

Discrepancies between Shopify and GA4 data can arise from several factors, such as ad blockers, server-side tracking, or improper configuration. A frequent problem is the mismatching of Order IDs, which occurs if the GA4 tracking code needs to be installed correctly on your Shopify store, leading to inaccurate data tracking.

Can you integrate Shopify with Google Analytics?

Yes, you can freely integrate your Shopify account with Google Ads or Google Analytics. You will need a valid Google sign-in, a Google-provided JavaScript code box, and an active Shopify account for successful integration.

How can I add e-commerce capabilities to GA4?

To add e-commerce features to GA4 using Google Tag Manager, navigate to Tags > New within the Tag Manager. Select Tag Configuration > Google Analytics: GA4 Event. Choose your Google Analytics 4 Configuration tag in the Configuration Tag section. Finally, specify the event name, such as ‘view_item_list’.

What steps are involved in connecting my website to GA4 without using Google Tag Manager?

To integrate GA4 without Google Tag Manager, go to Admin in the lower left corner of your GA4 account. Ensure your new GA4 property is selected in the Property column, then click on Data Streams, followed by Web. Select your data stream. Under Tagging Instructions, choose Add new on-page tag > Global Site Tag (gtag.js)